
Automated accessibility testing with axe-core: how we’re baking a11y into every build

Accessibility isn’t a one-time task. Like any important engineering practice, it’s something we need to revisit, refine, and build into our workflow over time. Which is why Last Call Media recently explored how to embed automated accessibility testing into our development workflow.
Our tool of choice? Axe-core, an open-source JavaScript library that scans for potential accessibility issues based on WCAG standards.
Our testing grounds? A client-facing tool we call “Broadcast.”
However, our ultimate goal wasn’t to improve the accessibility of this single project. Rather, it was to develop a sustainable approach to automated a11y testing that we can carry into future projects. Read on to learn what we tried, what we learned and where we’re headed next.
Why automate accessibility testing?
At Last Call Media, many of our teams have long relied on automated testing to catch functionality and performance issues before they reach our users. Accessibility issues should be treated no differently — the same practices that help maintain and guarantee functional quality can prevent accessibility barriers from slipping through unnoticed.
Unfortunately, accessibility testing is often neglected as it has a reputation for being complex, time-consuming, and impossible without specialized knowledge.
But this is where tools like axe-core change the game.
Getting to know axe-core: an engine for a11y testing tools
Before we dive into how we integrated axe-core in our own test suites, let’s take a look under the hood and understand how it works. At its heart, axe-core is a rule-based engine that analyzes the DOM using a set of rules mapped to WCAG success criteria.
While each rule is carefully designed, their structure is relatively simple. Let’s take a look at a common one — the image-alt rule:
{
  "id": "image-alt",
  "impact": "critical",
  "selector": "img",
  "matches": "no-explicit-name-required-matches",
  "tags": [
    "cat.text-alternatives",
    "wcag2a",
    "wcag111",
    "section508",
	   ...,
	   ...,
  ],
  "actIds": ["23a2a8"],
  "metadata": {
    "description": "Ensure <img> elements have alternative text or a role of none or presentation",
    "help": "Images must have alternative text"
  },
  "all": [],
  "any": [
    "has-alt",
    "aria-label",
    "aria-labelledby",
    "non-empty-title",
    "presentational-role"
  ],
  "none": ["alt-space-value"]
}
Each rule definition has several core components:
selector- The CSS selector used to target DOM elements (in this case, all <img> elements that are exposed to assistive tech.)any/ all/ none- These reference logical conditions (called “checks”) that determine if a rule passes or fails:anymeans at least one of these checks must passallmeans all listed checks must passnonemeans none must pass (if any do, it fails)
metadata- Human-readable descriptions, help messages, and links to WCAG success criteria and other resources — all of which help developers learn about accessibility in context!tags/ actIds- These classify rules with the relevant standard (like WCAG Level A: “wcag2a”), testing methodology (ACT Rules: “ACT”), or organizational policy.
The logic in each of these rules is highly scoped, explicit, and deterministic. Axe-core intentionally avoids flagging criteria that are open to interpretation or require human judgment — such as whether a page has a logical tab order or focus flow.
Putting axe-core to work
Once you understand axe-core’s purpose and rules, the next question is naturally: how does it fit into a development workflow?
Fortunately, we found that adding automated accessibility checks was surprisingly straightforward.
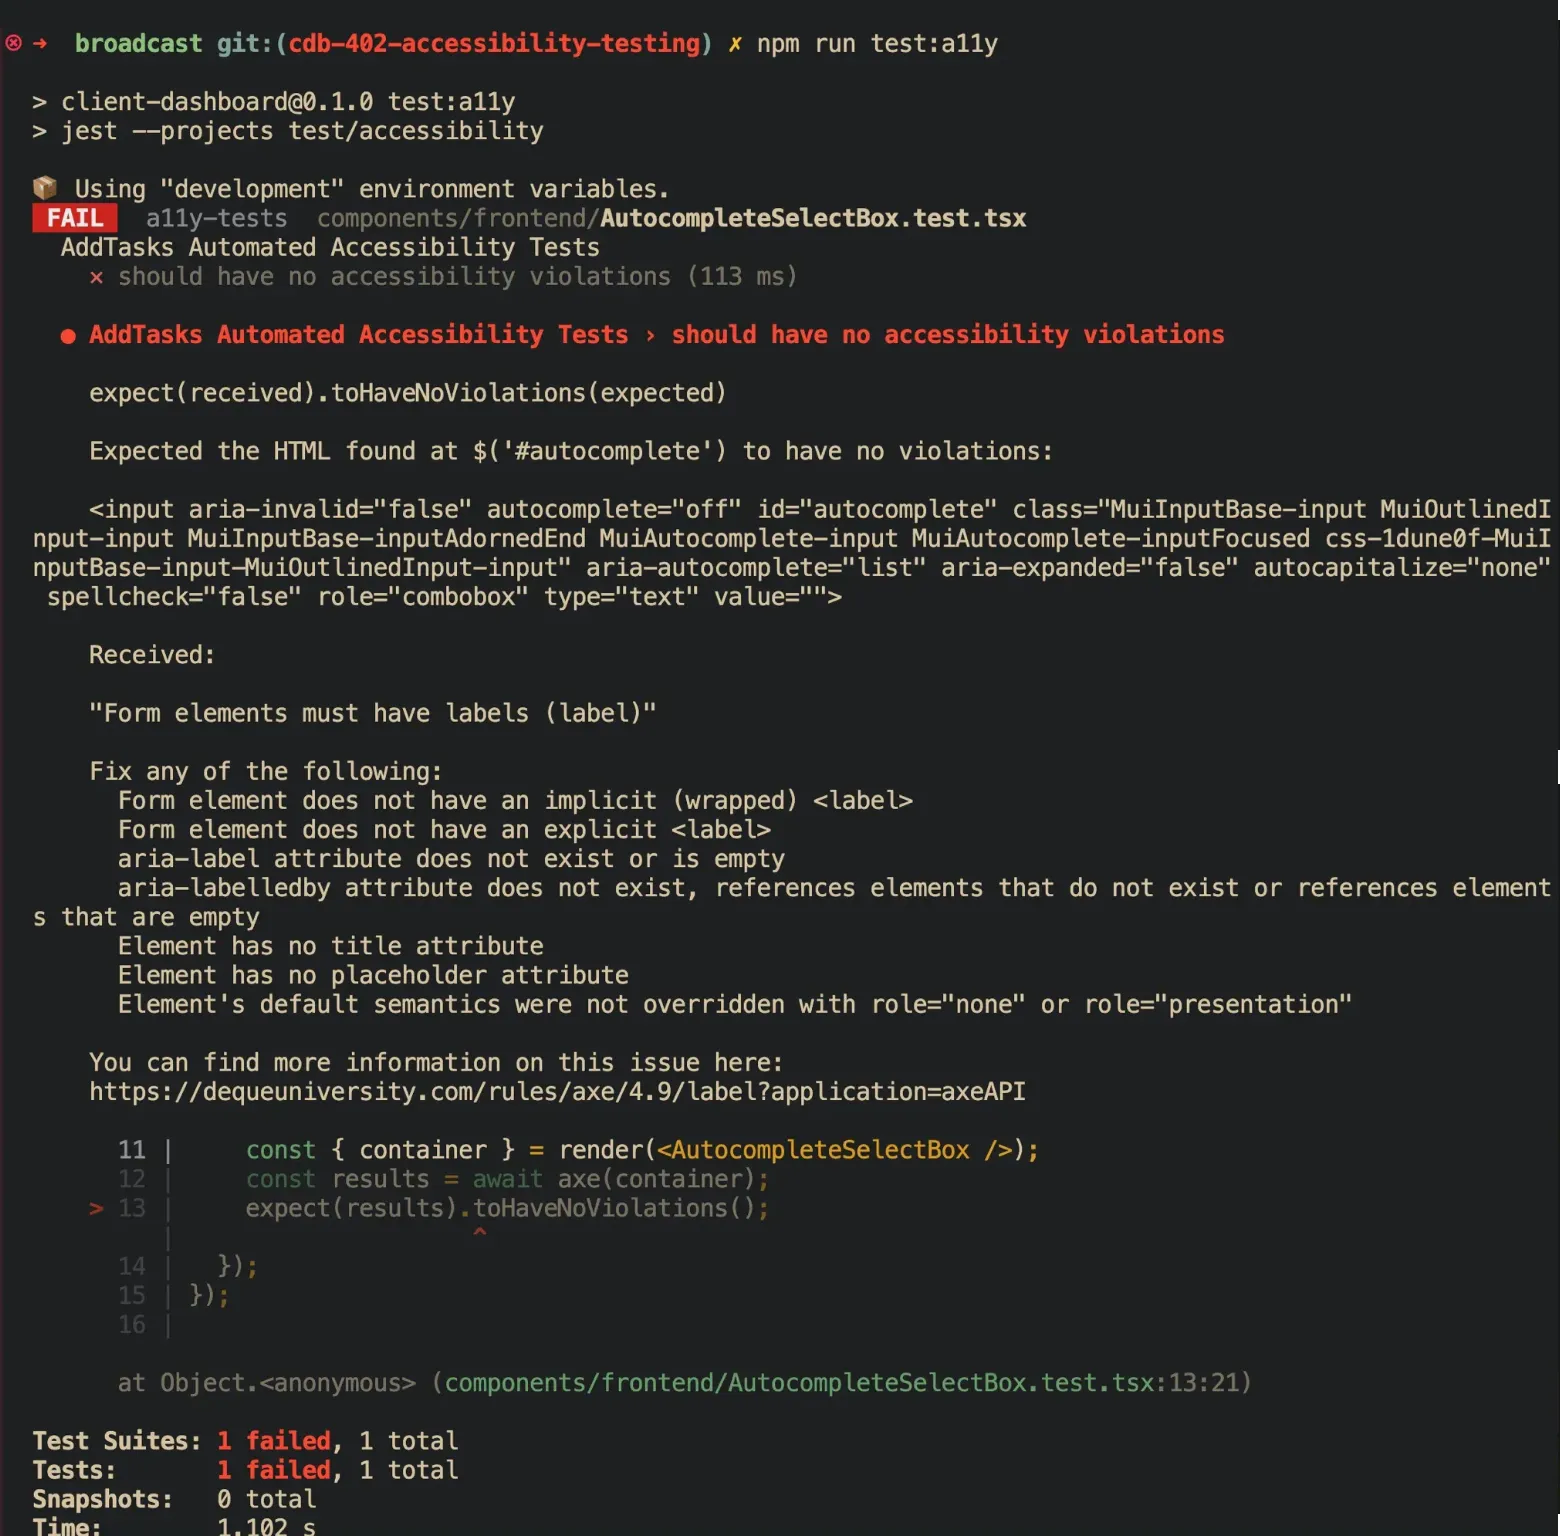
Unit-level testing with Jest
We used jest-axe for our unit tests, getting up and running with very little setup:
import { render } from '@testing-library/react';
import { axe, toHaveNoViolations } from 'jest-axe';
import { Component } from "../src/ui"
expect.extend(toHaveNoViolations); // put this in your test setup file to avoid redefining in each test!
test('Component should be accessible', async () => {
	const { container } = render(<Component />);
	const results = await axe(container);
	expect(results).toHaveNoViolations();
});
This test will render the component in a virtual DOM with React Testing Library and pass off that DOM fragment to axe() for evaluation. The rule engine scans the markup for violations based on the out-of-the-box rule set, scanning for around 80 built-in rules like the one we looked at above.
The toHaveNoViolations matcher shows that axe-core didn’t report any violations for the rendered output — and if it does, those failures will be reported directly inside test output.
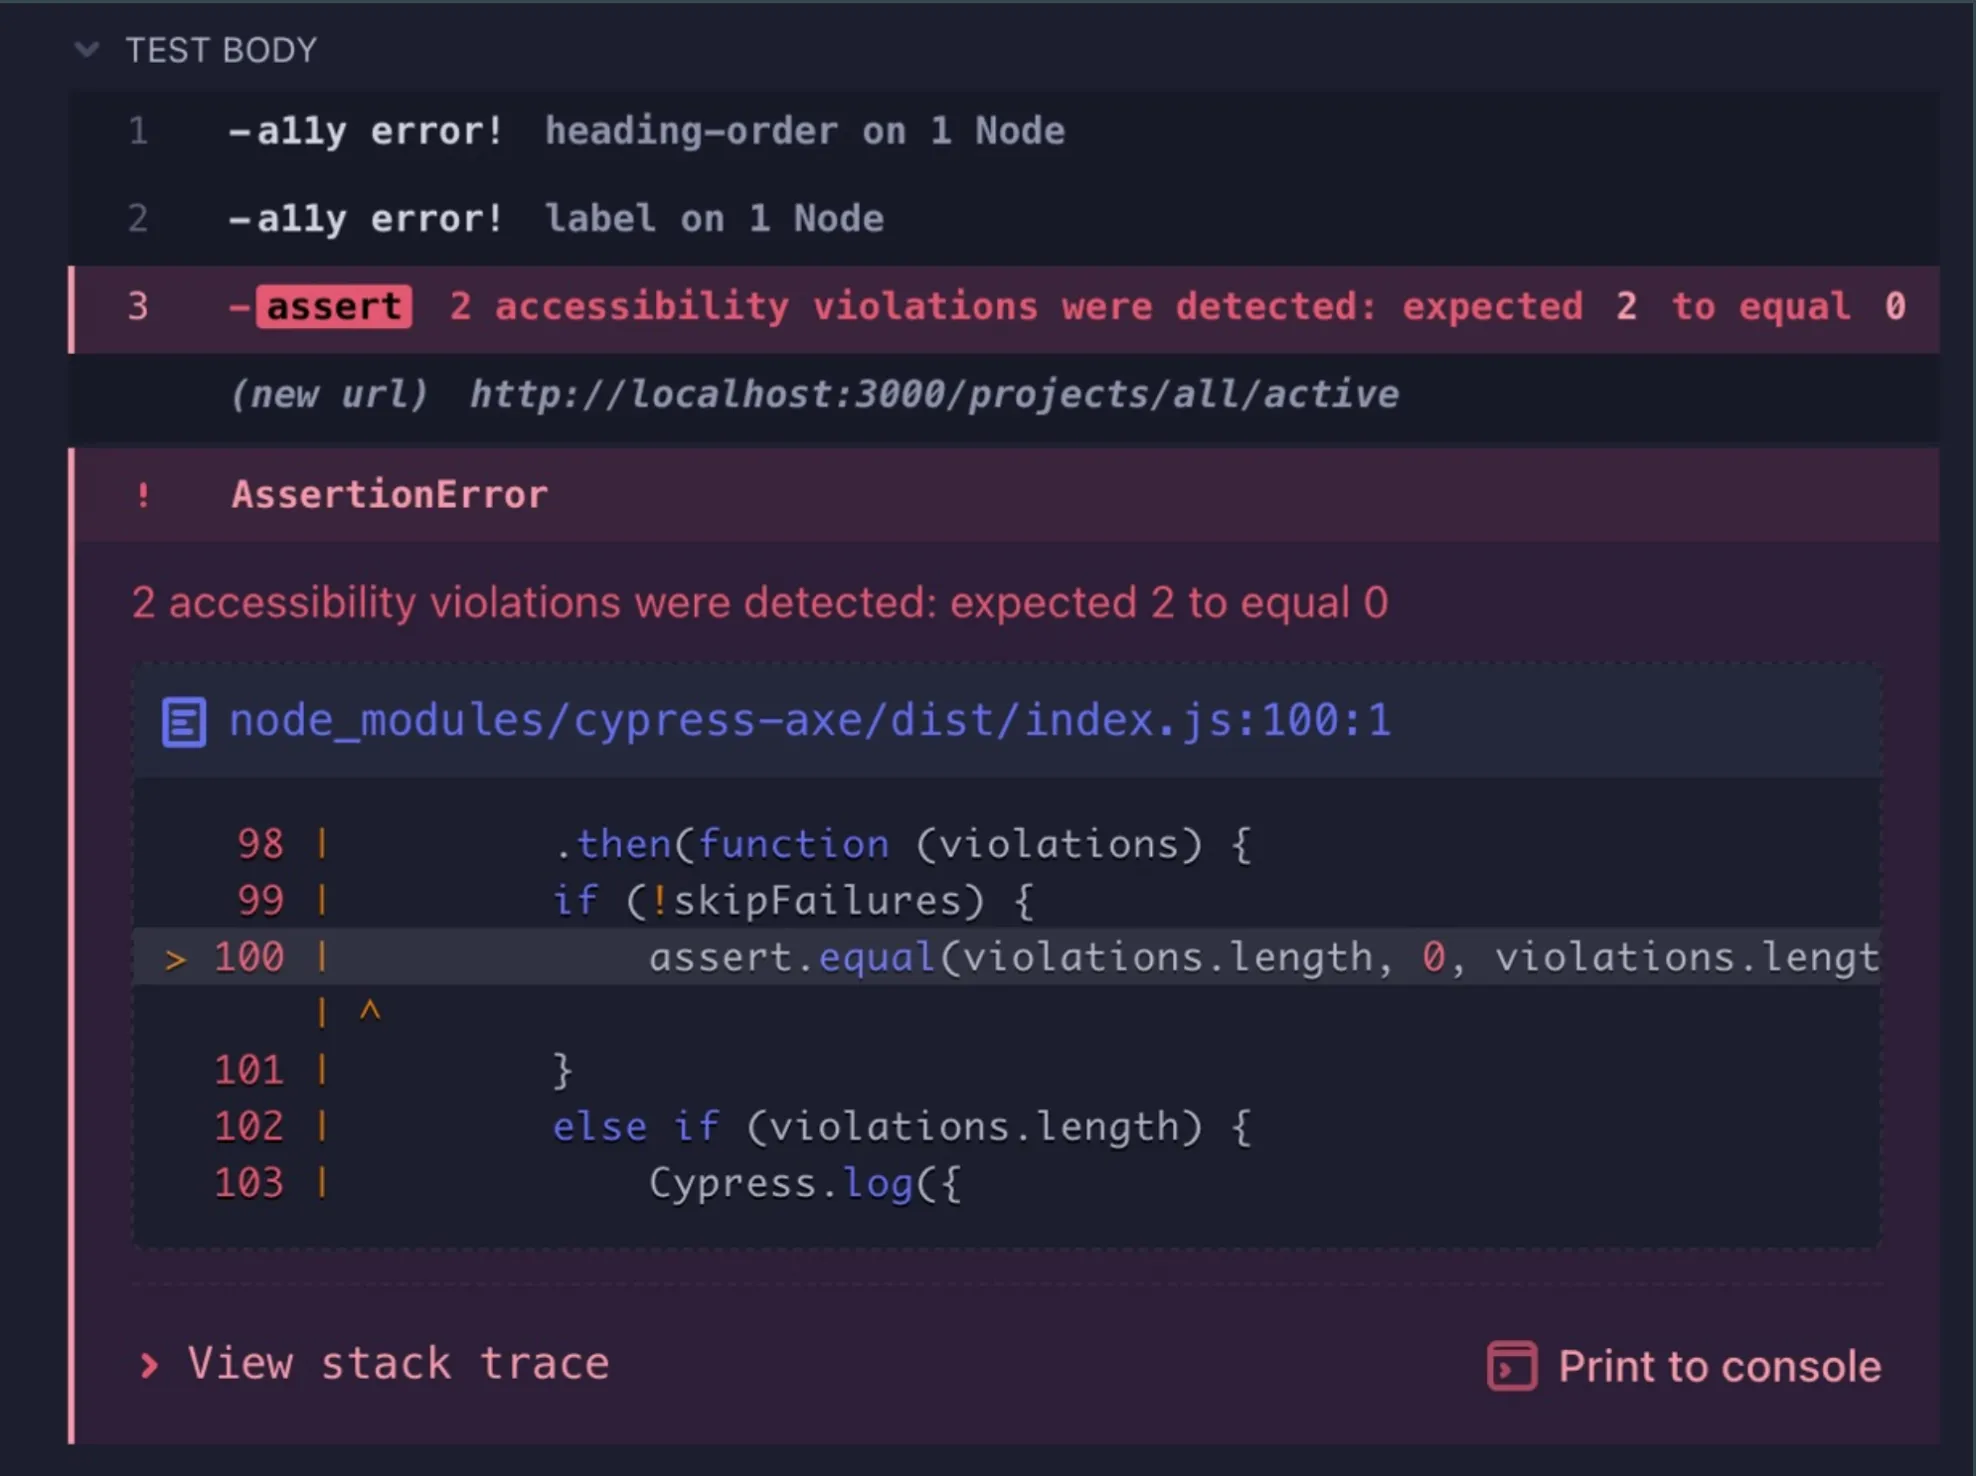
End-to-end testing with Cypress
Where Jest allows us to test in isolation, Cypress lets us test accessibility in a real browser with styles, layout and interaction. This allows us to run end-to-end testing that simulates real user journeys from start to finish, ensuring the code behaves as intended in real-world scenarios.
Using cypress-axe, we’re again up and running with just a few lines:
describe("Accessibility Tests", () => {
	beforeEach(() => {
		cy.visit(page);
		cy.injectAxe();
	});
	it("should have no accessibility violations on load", () => {
		cy.checkA11y();
	});
});
While setting this up is just as straightforward as it is in Jest, there are a few key differences. The cy.injectAxe() command injects the axe-core engine into the page — it must be called after cy.visit() and before cy.checkA11y(), in the same test or beforeEach block.
Cypress runs each test in a fresh browser context, so calling cy.visit() alone in a separate setup step won’t persist the injected script. If injectAxe() hasn’t been called in the current test, checkA11y() won’t have anything to run.
Once injected, cy.checkA11y() runs axe-core against the current DOM, using the same core rule set we saw earlier, and reports any violations directly in the test output. Cypress also has support for visual feedback in the browser runner, making debugging even smoother.
Customizing rule sets
Axe-core’s default behavior is a solid starting point. But accessibility isn’t a one-size-fits-all problem, so sometimes there are valid reasons to override or fine-tune the rule set. Axe-core allows us to control which rules run, their impact levels, and even how strictly we want to enforce them.
Disabling rules for known exceptions
Imagine your team is aware of contrast issues in a component, but that it won’t be updated until the next design pass. Instead of a consistently failing test or a failing build, we can disable the rule:
const results = await axe(container, {
  rules: {
    'color-contrast': { enabled: false },
  },
});
expect(results).toHaveNoViolations();
Filtering by impact level
If you’re just getting started with accessibility testing, it can be helpful to focus on high-priority issues to begin with:
const results = await axe(container);
const filtered = results.violations.filter(
  (v) => v.impact === 'critical' || v.impact === 'serious'
);
expect(filtered).toHaveLength(0);
Scoping tests to parts of the DOM
This can be helpful in cases where you have a third-party widget, or want to target a specific container or region of the page instead of the whole document.
// Cypress
cy.checkA11y('#main-content');
// Jest
const region = container.querySelector('#main-content');
const results = await axe(region);
And while it’s less common, axe-core also allows us to define custom rules that can be useful in advanced scenarios like design systems. You can learn more about writing custom rules using the Deque documentation.
What we learned from our axe-core experiment
By adding automated accessibility tests to our development workflow, we naturally created space for developers to learn about accessibility in context. Instead of having to memorize WCAG criteria or dig through documentation, teams got immediate feedback in their test output — with clear language, helpful links, and enough guidance to understand the issue and how to fix it.
Ultimately, making accessibility part of our routine allows devs to pick up knowledge and habits more organically.
What’s more, most of the violations we found weren’t dramatic. For the most part, they were missing labels, heading structure issues, or incorrect use of ARIA. Small things — but that’s exactly the point. Small issues account for a huge portion of the accessibility barriers that people face every day, even in products with thousands of users.
We’re dedicated to catching these errors early and consistently — not only to ensure compliance, but to build inclusive interfaces that everyone can use and enjoy.
Across the one million home pages that were analysed, 56,791,260 distinct accessibility errors were detected — an average of 56.8 errors per page.
Of course, automation can only take us so far. Tools like axe-core are intentionally scoped to avoid guessing at things that require human judgment. Manual, human-centered testing remains essential to truly understand and improve the user experience. Automation helps us spend our manual testing time where it matters most.
How we’re scaling our a11y automation success
Adding accessibility checks to one project turned out to be a small lift with big payoff, and now we’re looking ahead. Our team is working to scale automated coverage across more projects, making these checks a routine part of how we write and ship code.
We’re also thinking about how to surface accessibility results beyond test output, bringing that visibility into tools used by designers, PMs and QA. The more we share responsibility, the more accessible our work becomes by default. And that’s the goal — not just to fix issues when they come up, but to build with accessibility in mind from the start.
Need help integrating accessibility into your own products and processes? Learn how we get results with comprehensive testing and human-centered design.